
InDesign and Text Wrap
InDesign and Text Wrap...
Working with InDesign and Text Wrap gives your layouts extra polish. In addition to simply placing images and text on the page there are times when you want your text to flow around image and the text to have a certain amount of outset around the image frame. This means using text wrap in the layout or spread. In this post we take a look at how text frames and image frames can interact to produce professional looking layouts and spreads.
So what makes a good wrap?...
Flexibiliy and making sure your offset has the right space. Too much or too little space will ruin a good looking wrap and spoil the overall look of the layout. InDesign provides you with a number of text wrap options but in this post we are looking at two specific ones, 'Around the Shape' and 'Around the Bounding Box'
How to wrap text...
Go to the object or image to want text to wrap around using one of the Selection Tools
Go to the Window Menu >Text Wrap
Choose the required wrap option (in this instance) Wrap Around the Bounding Box (as shown below - second icon in from the left)
This will initiate a a box wrap around the object /images bounding box
Set the Outset Wrap by adjusting the box spinners (to change from 'Make all settings the same' - click on the Link icon as shown below)

Text Wrap Options
Wrap Around Bounding Box - This creates a rectangular wrap where width & height come from the box (bounding box) around the image.
Wrap Around Object Shape - Contour wrapping creates text wrap around the box (bounding box) the same shape as the selected frame (offset distances are specified you)
Jump Object - Stops text wrapping to either the left or the right of the image frame
Jump to Next Obect - Stops text showing in space either to the right or left of the image frame.
Jump to the Next Column - Pushes the text to the top of the next frame or column
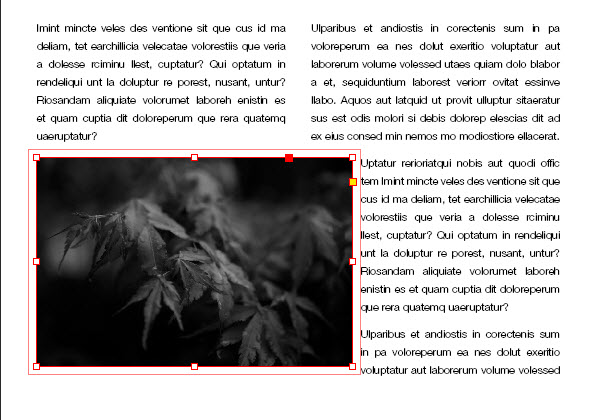
Example of Text Wrap around Bounding Box...
The centre red border around the image is known as a bounding box because it binds the content inside the frame. The outer, thinner red border is the text wrap with the Make all Settings the Same' selected.
Note! You can opt to choose which settings you wish to to change by deselecting this and just adjusting one check box
Wrap Options
These determine how the text wraps around the image
Custom text wrap to an InDesign Bounding Box...
Onsite Adobe InDeign Courses Info..
Text wrapping in InDesign is covered on our Introduction to InDesign Training Course but you can find out more about all of our Adobe InDesign Courses here on our info page. If you prefer you can reach us via the contact page or email us to arrange a call to discuss your training.
Onsite InDesign Training...
Our InDesign Training Courses are held onsite at your premises across the UK, the Midlands and all major cities including Nottingham, Derby, Lincoln, Leicester, Liverpool, Worcester, Birmingham and all surrounding areas.